Easy Guide: Enable SSH On Raspberry Pi For Remote Access!
Ever found yourself locked out of your Raspberry Pi, wishing you could just sidestep the monitor and keyboard? The key to unlocking that remote access lies in mastering SSH.
Secure Shell, or SSH, is a cornerstone of remote system administration. It's your encrypted tunnel, your digital passport, allowing you to securely command and control your Raspberry Pi from anywhere on your network, or even across the internet. Whether you're a seasoned developer or a curious tinkerer, understanding how to enable SSH on your Raspberry Pi is a fundamental skill. This unlocks a world of possibilities, from managing your Pi as a headless server to remotely troubleshooting issues without ever physically touching the device.
| Category | Information |
|---|---|
| Protocol Name | Secure Shell (SSH) |
| Function | Secure remote login and file transfer |
| Encryption | Cryptographic network protocol |
| Default Port | 22 |
| Key Advantages | Secure, encrypted communication, remote management, file transfer |
| Common Use Cases | Remote server administration, secure file transfer, tunneling |
| Related Protocols | SFTP (SSH File Transfer Protocol), SCP (Secure Copy) |
| More Information | SSH.com |
The Raspberry Pi, in its default configuration, takes security seriously. That's why SSH is disabled right out of the box. This precaution prevents unauthorized access and safeguards your device from potential vulnerabilities. However, enabling SSH is a straightforward process, and there are multiple ways to accomplish it, depending on your setup and preferences. The simplest method involves interacting directly with the Raspberry Pi using a monitor and keyboard. Another option, ideal for headless setups (where you don't have a monitor connected), leverages the Raspberry Pi Imager tool or manipulating files on the SD card's boot partition.
- Adriana Limas Kids A Glimpse Into Her Family Life Updated
- Bumpy Johnson The Real Story Behind Harlems Godfather
Let's dive into the practical steps of enabling SSH. First, consider whether you have a monitor and keyboard readily available. If so, the graphical user interface (GUI) offers a convenient way to toggle SSH on. If you're embracing the headless approach, we'll explore alternative methods that involve pre-configuring the SD card before booting the Raspberry Pi for the first time.
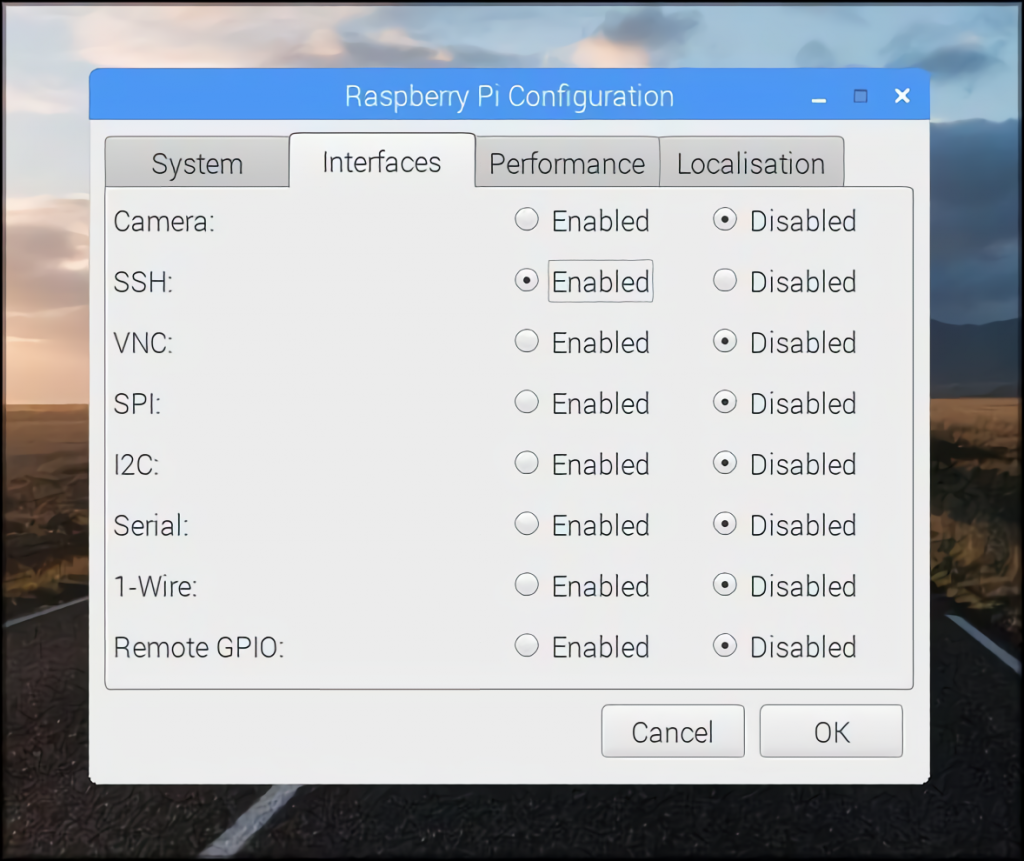
Enabling SSH via the Raspberry Pi Configuration Menu (GUI): If you have a monitor and keyboard connected to your Raspberry Pi, this is perhaps the most intuitive method. Boot up your Raspberry Pi and navigate to the Raspberry Pi Configuration menu. This can be found under Preferences in the main menu, typically accessed by clicking the Raspberry Pi icon in the top-left corner of the screen. Once the configuration window opens, select the "Interfaces" tab. You'll see a list of services, including SSH. Simply click the "Enable" option next to SSH and then click "OK" to save your changes. That's it! SSH is now enabled, and you can connect to your Raspberry Pi remotely.
Enabling SSH Using Raspberry Pi Imager (Headless Setup): For those setting up a Raspberry Pi without a monitor, the Raspberry Pi Imager tool provides a powerful way to pre-configure SSH during the operating system installation process. Download and install the Raspberry Pi Imager on your computer. Insert your SD card into your computer and launch the Imager. Select the operating system you want to install on your Raspberry Pi. Before clicking "Write," click the "Settings" icon (it looks like a gear). This will open the advanced options. In the "Services" tab, you'll find an option to enable SSH. You can also set a username and password for the Raspberry Pi. These credentials will be used to log in remotely. Once you've configured these settings, click "Save" and then "Write" to flash the operating system to the SD card. After the process completes, safely eject the SD card and insert it into your Raspberry Pi. When you boot the Pi, SSH will be automatically enabled.
- Khabib Nurmagomedovs Wife All About Patimat 2024 Update
- Taurus Scorpio Friendship Compatibility Challenges More
Enabling SSH by Creating an 'ssh' File (Headless Setup): This is another popular method for enabling SSH on a headless Raspberry Pi. It involves creating an empty file named 'ssh' (without any extension) on the boot partition of the SD card. First, flash the Raspberry Pi OS onto the SD card using the Raspberry Pi Imager or another tool. Once the flashing process is complete, your computer should recognize the boot partition of the SD card. Create a new, empty file named 'ssh' in the root directory of the boot partition. Ensure that the file has no extension. Safely eject the SD card from your computer and insert it into your Raspberry Pi. When you power on the Pi, it will detect the 'ssh' file and automatically enable SSH.
Once you've enabled SSH, the next step is to determine the IP address of your Raspberry Pi. This is the address you'll use to connect to it remotely. If you have a display connected, you can easily find the IP address using the command line. Open a terminal window and type `ifconfig` (or `ip addr` on newer systems). Look for the 'inet' address under the network interface (usually 'eth0' for wired connections or 'wlan0' for wireless connections). The IP address will typically be in the format 192.168.x.x or 10.x.x.x.
If you're running a headless setup, there are several ways to find the IP address. You can check your router's administration panel, which usually lists all connected devices and their IP addresses. Alternatively, you can use a network scanning tool like nmap or Angry IP Scanner to scan your local network and identify the Raspberry Pi based on its hostname (usually 'raspberrypi').
Now that you have the IP address and SSH enabled, you're ready to connect to your Raspberry Pi remotely. On a Mac or Linux system, open a terminal window and use the following command: `ssh pi@`. Replace `` with the actual IP address of your Raspberry Pi. You'll be prompted for the password. If you haven't changed the default password, it's 'raspberry'.
If you're using Windows, you'll need an SSH client like PuTTY. Download and install PuTTY. Open PuTTY and enter the IP address of your Raspberry Pi in the "Host Name (or IP address)" field. Ensure that the port is set to 22 (the default SSH port). Click "Open" to start the SSH session. You'll be prompted for the username and password.
Once you've successfully logged in, you'll see the Raspberry Pi command-line interface in your terminal or PuTTY window. You can now execute commands on your Raspberry Pi remotely. This opens up a whole new world of possibilities, from managing files and installing software to configuring system settings and running applications.
For added security, consider using SSH keys instead of passwords. SSH keys provide a more secure way to authenticate to your Raspberry Pi. To generate an SSH key pair, use the `ssh-keygen` command on your local machine. Copy the public key to your Raspberry Pi using the `ssh-copy-id` command. Once the public key is installed, you can log in to your Raspberry Pi without being prompted for a password.
SSH isn't just for remote access; it's also a powerful tool for secure file transfer. The SSH File Transfer Protocol (SFTP) provides a secure alternative to FTP. You can use SFTP clients like FileZilla or WinSCP to transfer files between your computer and your Raspberry Pi. These clients encrypt the data during transmission, ensuring that your files are protected from eavesdropping.
In addition to SFTP, you can also use the `scp` command to securely copy files between your computer and your Raspberry Pi. The `scp` command is similar to the `cp` command, but it uses SSH to encrypt the data during transfer. For example, to copy a file named `my_file.txt` from your computer to the home directory on your Raspberry Pi, you would use the following command: `scp my_file.txt pi@:/home/pi/`.
Furthermore, SSH's tunneling capabilities are a game-changer. Imagine you're running a web server on your Raspberry Pi, but you want to access it securely from outside your local network. SSH tunneling allows you to create a secure connection from your computer to your Raspberry Pi, forwarding traffic through the SSH tunnel. This protects your data from being intercepted and ensures that your web server is only accessible to authorized users.
To create an SSH tunnel, use the `-L` option with the `ssh` command. For example, to forward port 80 on your Raspberry Pi to port 8080 on your local machine, you would use the following command: `ssh -L 8080:localhost:80 pi@`. This command creates a tunnel from your local machine's port 8080 to the Raspberry Pi's port 80. You can then access the web server on your Raspberry Pi by opening a web browser and navigating to `http://localhost:8080`.
The security of your Raspberry Pi is paramount, and SSH plays a crucial role in maintaining that security. Always use strong passwords or, even better, SSH keys. Keep your Raspberry Pi operating system and SSH software up to date to patch any security vulnerabilities. Be cautious about opening SSH to the public internet. If you must expose SSH to the internet, consider using a firewall to restrict access to specific IP addresses or using a port other than the default port 22.
Enabling SSH on your Raspberry Pi is a gateway to remote control, secure file transfer, and enhanced security. Whether you're building a home automation system, a media server, or a development platform, mastering SSH is an invaluable skill that will empower you to get the most out of your Raspberry Pi.
The Raspberry Pi supports connections via the ethernet port out of the box. Remote access to the raspberry pi terminal enable ssh on the raspberry pi. Were assuming that you have raspbian installed on your raspberry pi. Enabling ssh on raspberry pi without a screen # if you dont have a spare hdmi display or keyboard available to hook up the raspberry pi you can easily enable ssh by placing an empty file named ssh ( without any extension ) into the boot partition. To enable ssh on your enable ssh on raspberry pi os while writing os image. Enable ssh on raspberry pi in headless mode. Using gui configurations to enable ssh on raspberry pi. Start and enable ssh using systemctl. What is ssh and why use it with raspberry pi? Ssh (secure shell) is a cryptographic network protocol that provides secure remote login and file transfer between computers. For raspberry pi users, ssh offers several advantages: Use the raspberry pi without a monitor, keyboard, or mouse. To enable ssh on your raspberry pi during installation of raspberry pi os, you can use the advanced settings in the raspberry pi imager tool. This guide provides a comprehensive overview of how to use ssh (secure shell) for remote management of a raspberry pi. It covers enabling ssh via 'raspi config,' including steps for mac and windows users. The guide emphasizes finding the raspberry pi's unique ip address and provides troubleshooting tips for common connection issues. Enable ssh through the desktop one way to turn on ssh is through the raspberry pi graphical configuration app. Just click the raspberry icon in the top left corner of the screen, then click preferences. click raspberry pi configuration.
- Claudia Heffner Peltz Model Wife Philanthropist Full Story
- Diplos Kids Baby Mamas A Look At His Family Life
How to Enable SSH on Raspberry Pi Ultimate Guide NerdyTechy

Setting Up Web SSH On Raspberry Pi A Comprehensive Guide

Mastering Remote IoT Management A Guide To SSH Access On Raspberry Pi
